YOLO11 详解

Last updated on December 9, 2024 pm

2024 年是 YOLO 模型的一年。在 2023 年发布 Ultralytics YOLOv8 之后, YOLOv9 和 YOLOv10也在2024年发布了。但等等,这还不是结束!Ultralytics YOLO11 终于来了,在激动人心的 YOLO Vision 2024 (YV24) 活动中亮相。
YOLO11 系列是 YOLO 系列中最先进的 (SOTA)、最轻、最高效的型号,性能优于其前代产品。它由 Ultralytics 创建,该组织发布了 YOLOv8,这是迄今为止最稳定和使用最广泛的 YOLO 变体。现在,YOLO11 将继续 YOLO 系列的传统。在本文中,我们将探讨:

  • 什么是 YOLO11?
  • YOLO11 能做什么?
  • YOLO11 比其他 YOLO 变体更高效吗?
  • YOLO11 架构有哪些改进?
  • YOLO11 的代码pipeline是如何工作的?
  • YOLO11 的基准测试
  • YOLO11 快速回顾

什么是YOLO11

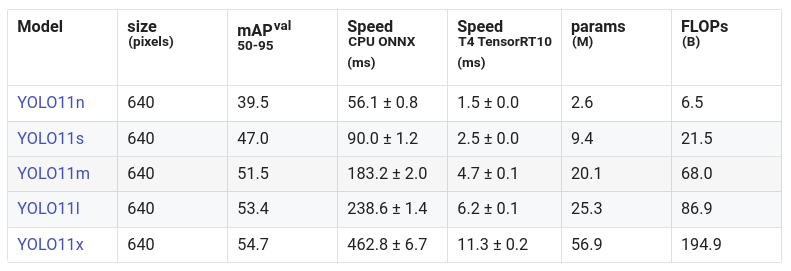
YOLO11 是 Ultralytics 的 YOLO 系列的最新版本。YOLO11 配备了超轻量级型号,比以前的 YOLO 更快、更高效。YOLO11 能够执行更广泛的计算机视觉任务。Ultralytics 根据大小发布了 5 个 YOLO11 模型,并在所有任务中发布了 25 个模型

  • YOLO11n – Nano 适用于小型和轻量级任务。
  • YOLO11s – Nano 的小升级,具有一些额外的准确性。
  • YOLO11m – 通用型。
  • YOLO11l – 大,精度更高,计算量更高。
  • YOLO11x – 超大尺寸,可实现最大精度和性能。

YOLO11 构建在 Ultralytics YOLOv8 代码库之上,并进行了一些架构修改。它还集成了以前 YOLO(如 YOLOv9 和 YOLOv10)的新功能(改进这些功能)以提高性能。我们将在博客文章的后面部分探讨架构和代码库中的新变化。

YOLO11的应用

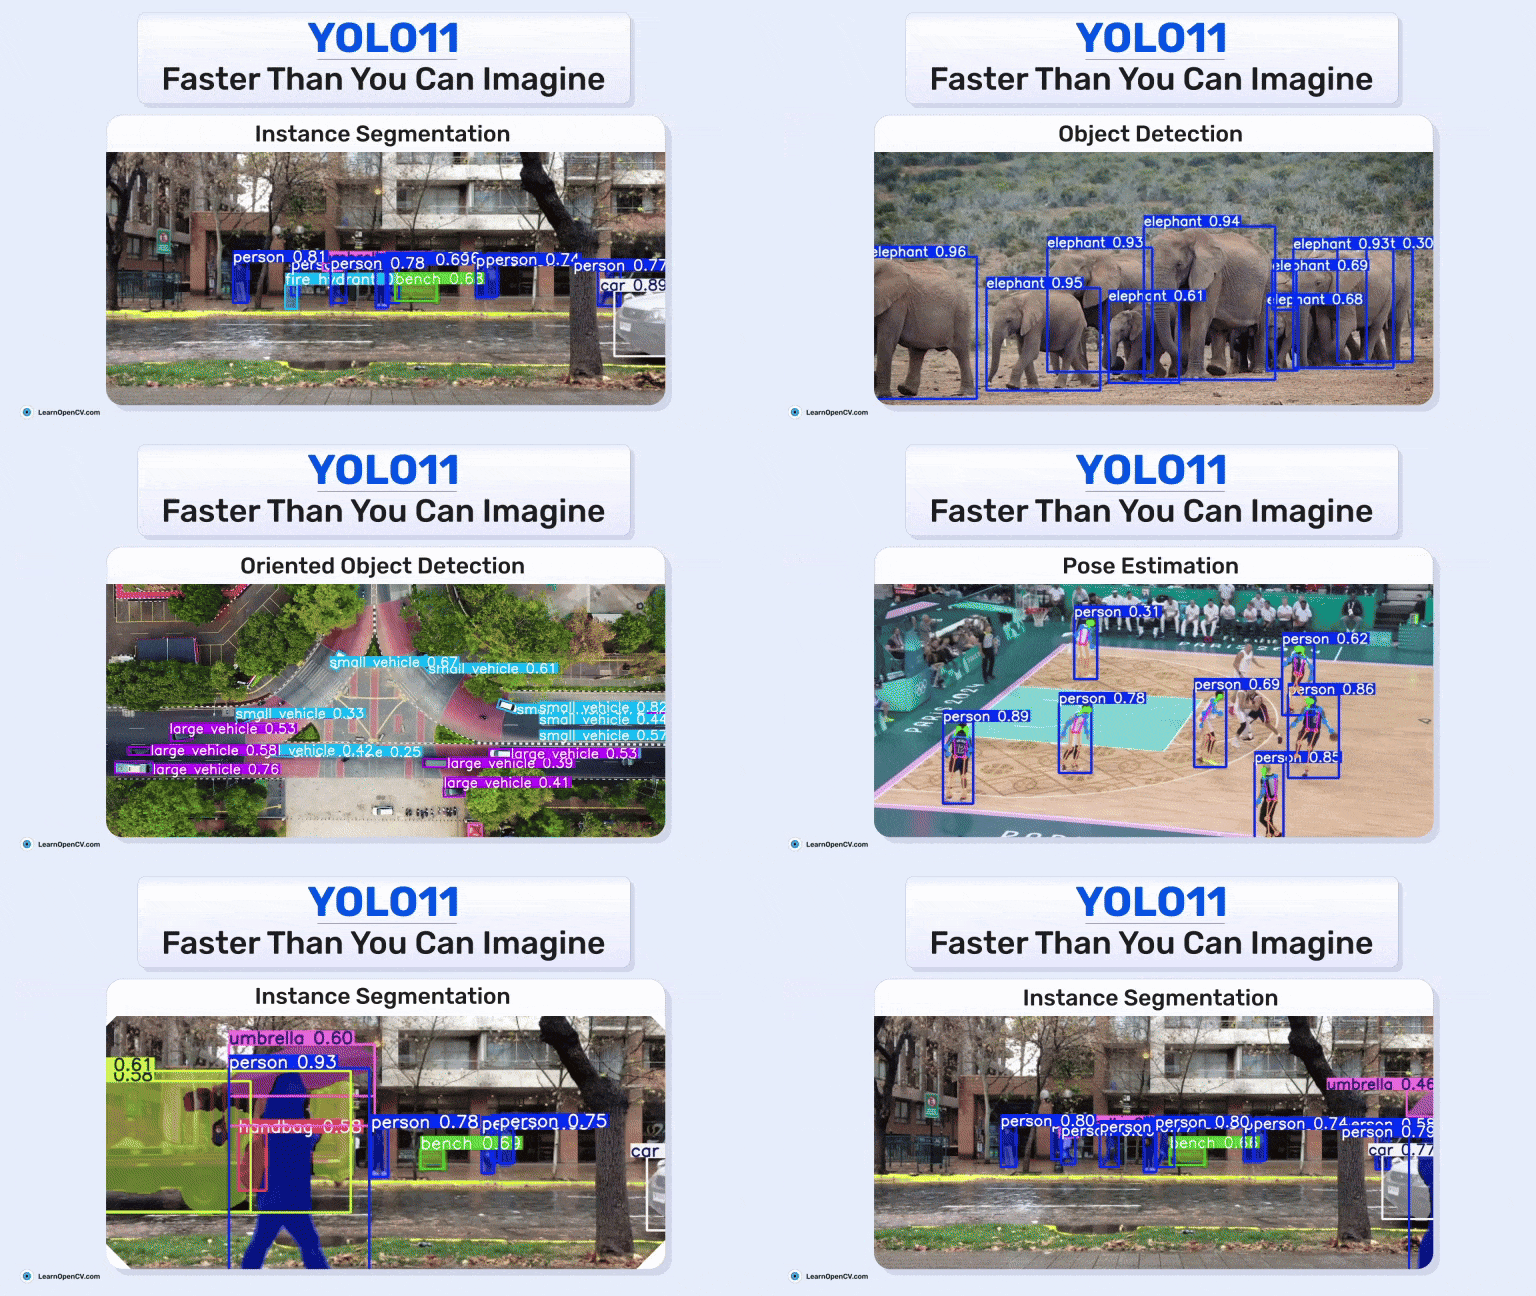
YOLO 以其对象检测模型而闻名。但是,YOLO11 可以执行多个计算机视觉任务,例如 YOLOv8。它包括:

  • 对象检测
  • 实例分段
  • 图像分类
  • 姿势估计
  • 定向目标检测 (OBB)

让我们来探索所有这些。

对象检测

yolo11-对象检测

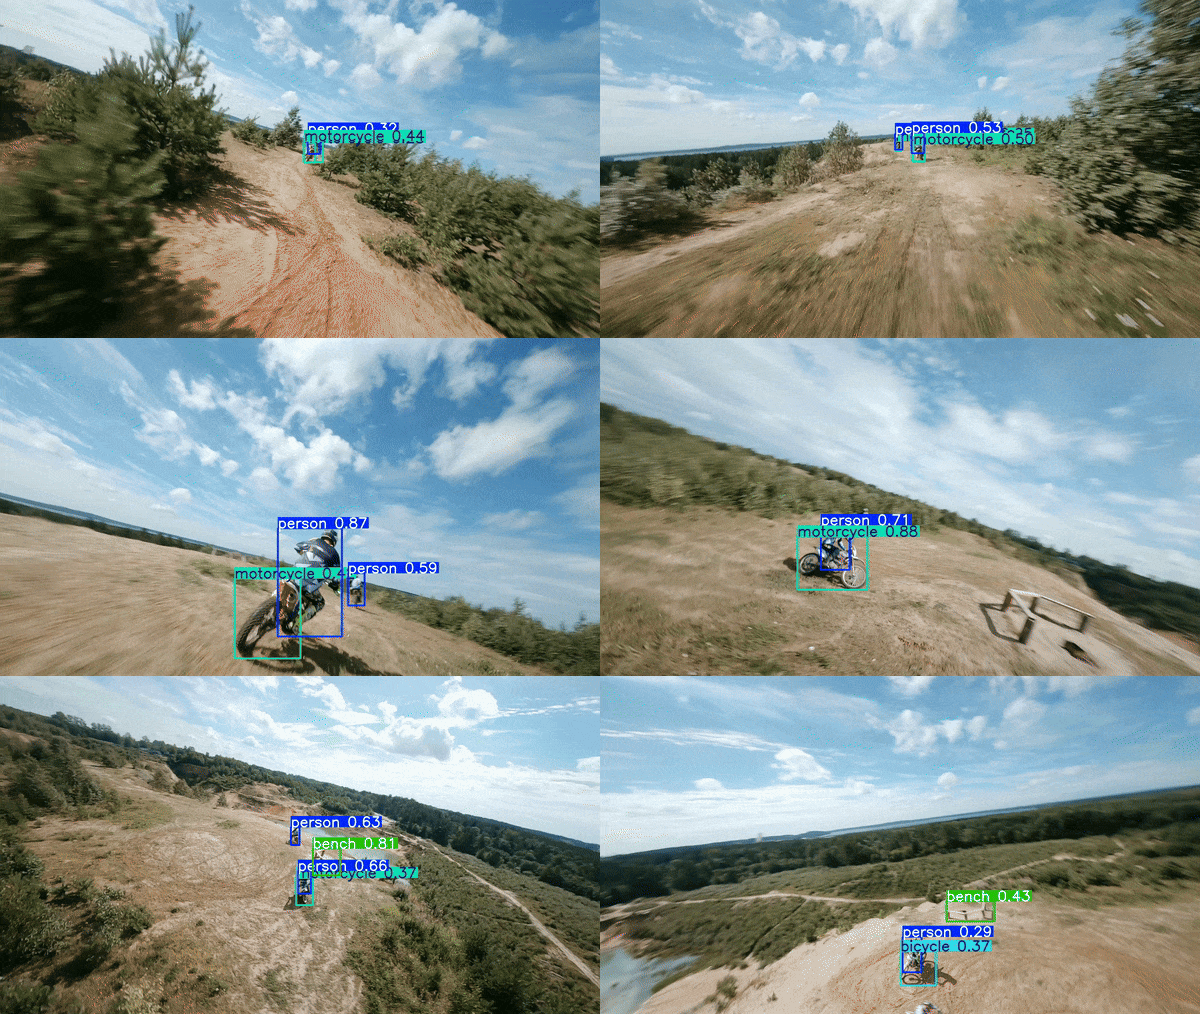
YOLO11 通过将输入图像传递到 CNN 以提取特征来执行对象检测。然后,网络预测这些网格中对象的边界框和类概率。为了处理多尺度检测,使用图层来确保检测到各种大小的物体。然后使用非极大值抑制 (NMS) 来优化这些预测,以过滤掉重复或低置信度的框,从而获得更准确的对象检测。YOLO11 在 MS-COCO 数据集上进行对象检测训练,其中包括 80 个预训练类。

实例分割
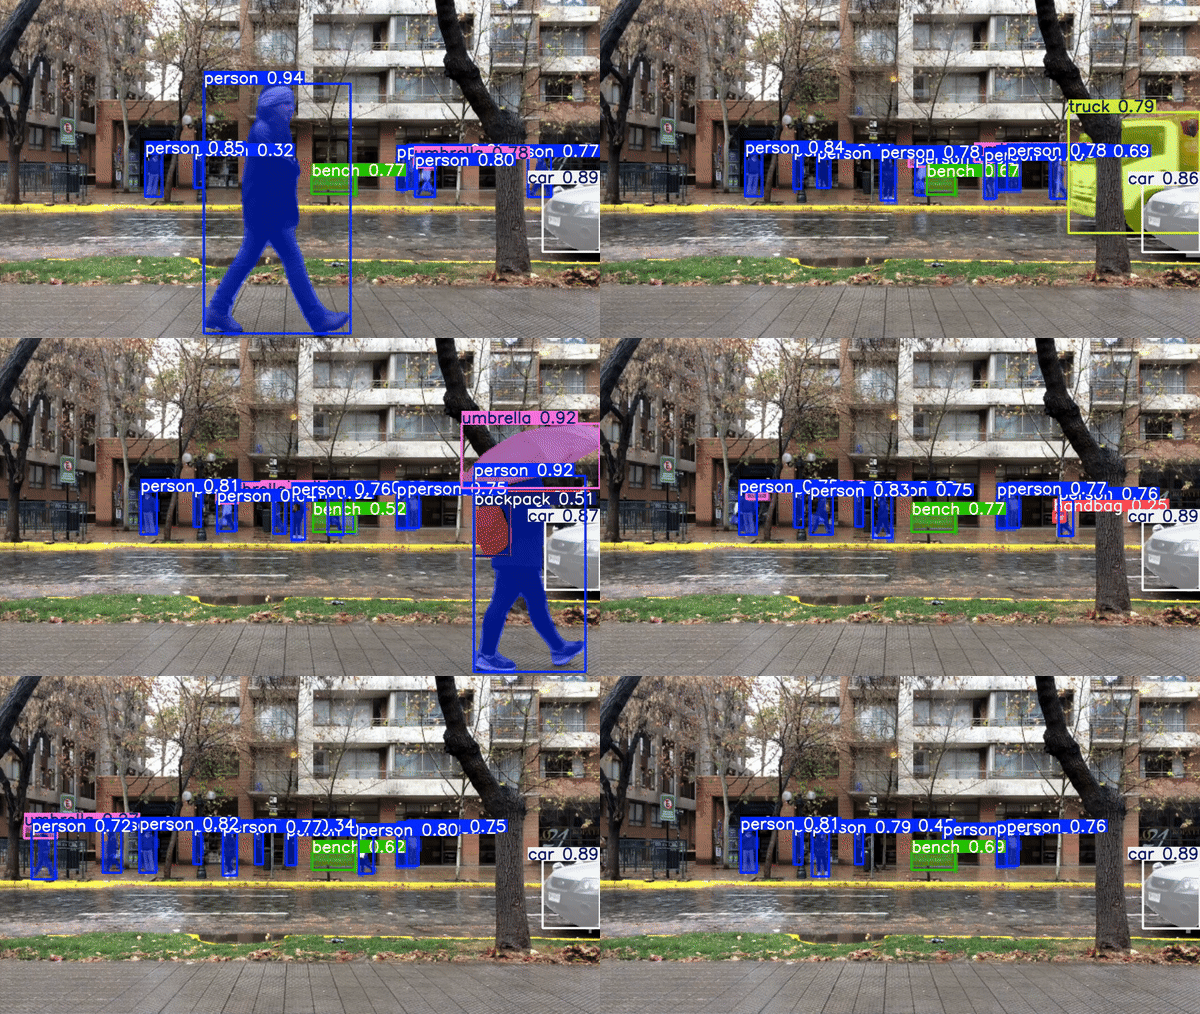
除了检测对象之外,YOLO11 还通过添加掩码预测分支扩展到实例分割。这些模型在 MS-COCO 数据集上进行训练,其中包括 80 个预训练类。此分支为每个检测到的对象生成像素级分割掩码,使模型能够区分重叠的对象并提供其形状的精确轮廓。head 中的蒙版分支处理特征映射并输出对象蒙版,从而在识别和区分图像中的对象时实现像素级精度。

姿势估计
YOLO11 姿势

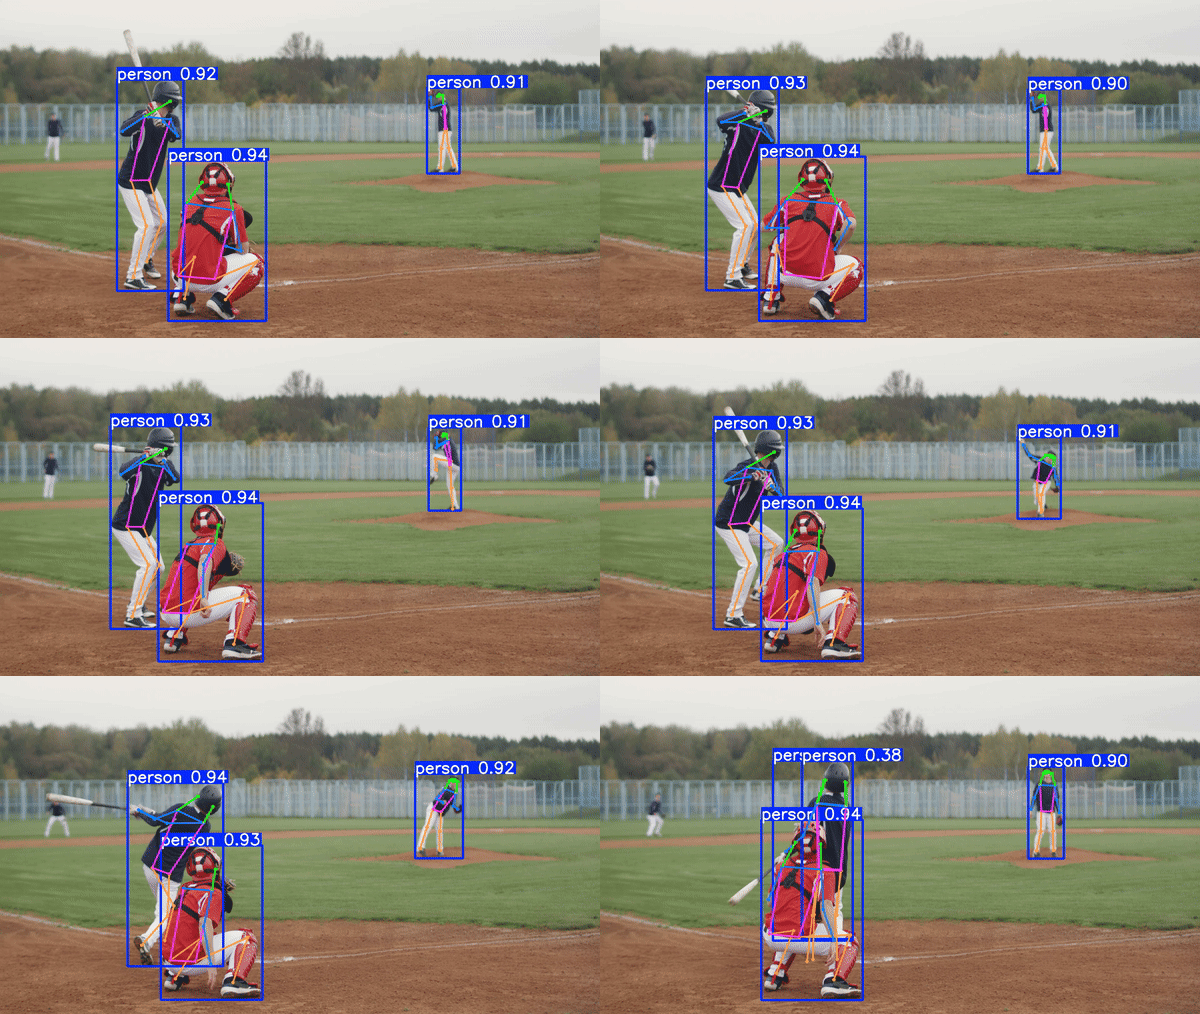
YOLO11 通过检测和预测物体上的关键点(例如人体的关节)来执行姿态估计。关键点连接起来形成骨架结构,该结构表示姿势。这些模型在 COCO 上进行训练,其中包括一个预先训练的类“person”。

在头部添加姿态估计层,并训练网络预测关键点的坐标。后处理步骤将点连接起来以形成骨架结构,从而实现实时姿势识别。

图像分类
YOLO11 图像分类

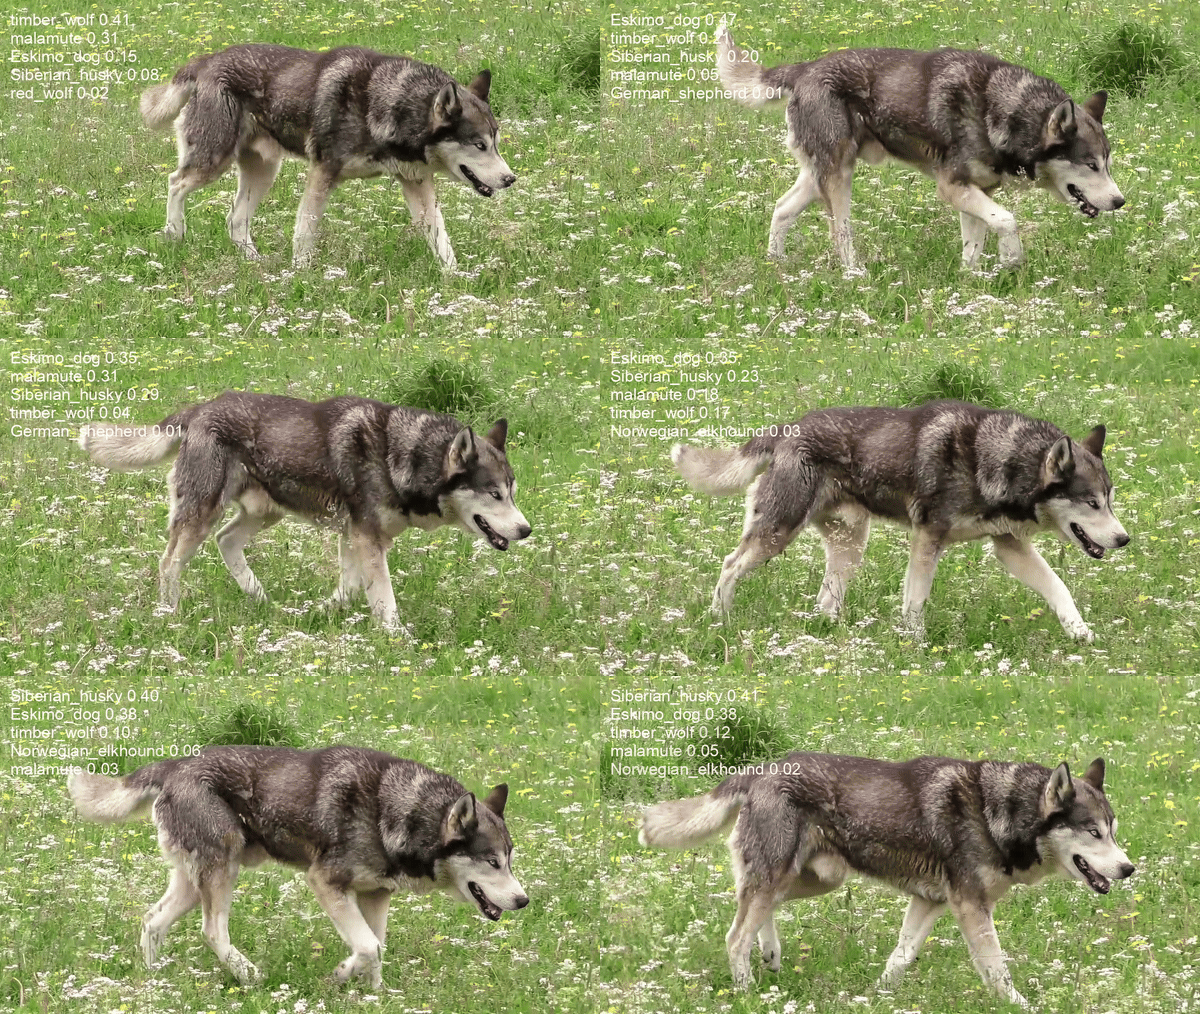
对于图像分类,YOLO11 使用其深度神经网络从输入图像中提取高级特征,并将其分配给多个预定义类别之一。这些模型在 ImageNet 上进行训练,其中包括 1000 个预训练类。该网络通过多层卷积和池化处理图像,在增强基本特征的同时减少空间维度。网络顶部的分类头输出预测的类,使其适用于需要识别图像整体类别的任务。

定向目标检测 (OBB)
YOLO11-OBB

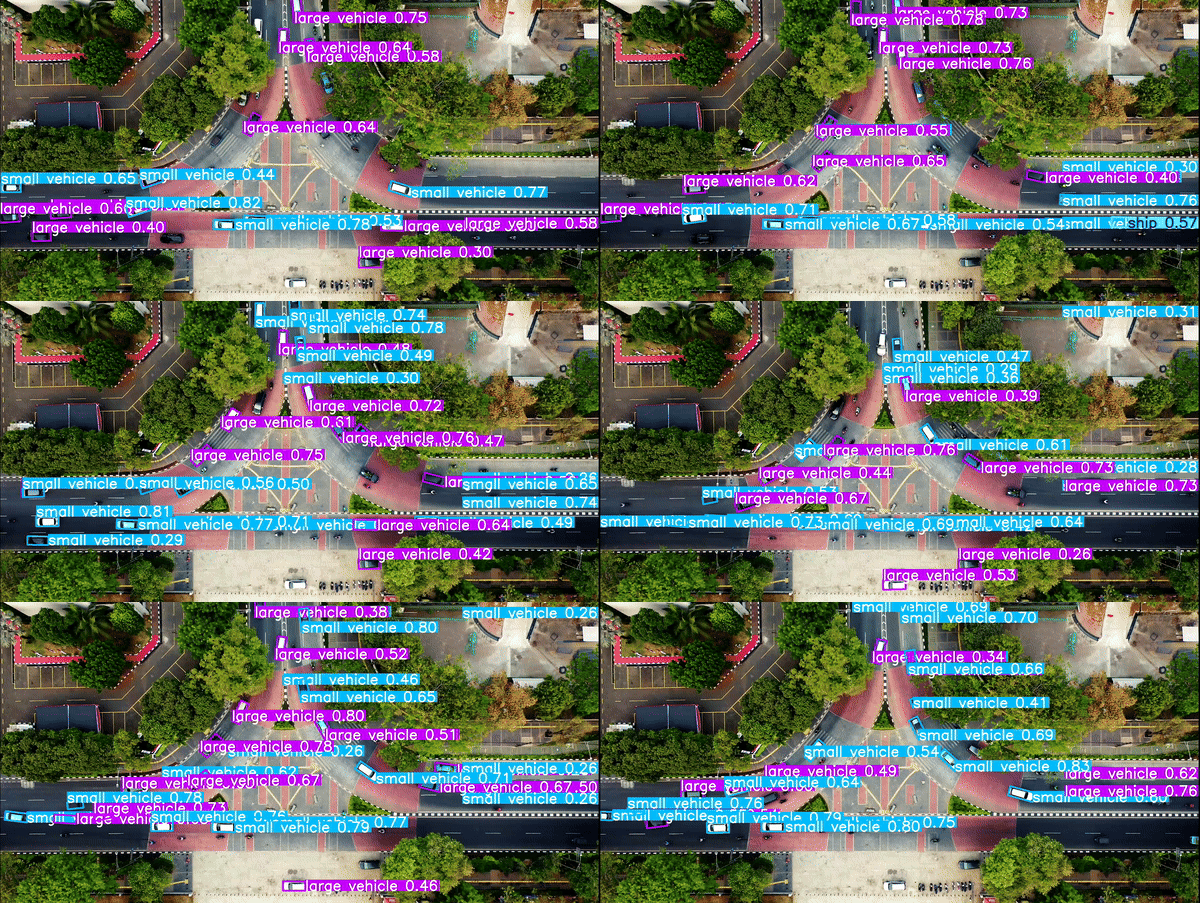
YOLO11 通过整合 OBB 扩展了常规对象检测,使模型能够检测和分类旋转或不规则方向的物体。这对于航空影像分析等应用程序特别有用。这些模型在 DOTAv1 上进行训练,其中包括 15 个预训练类。
YOLO11-OBB

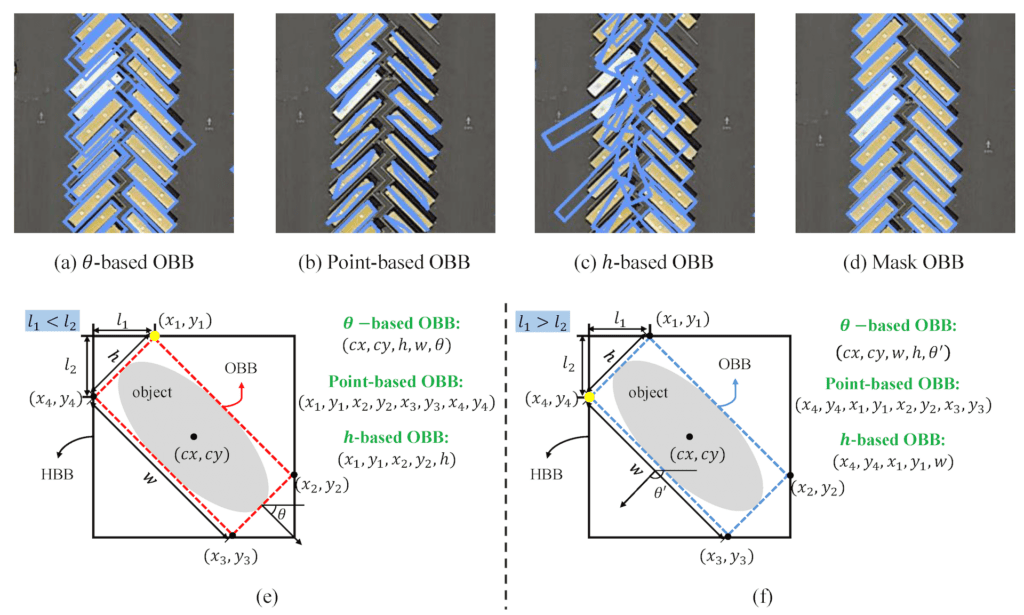
OBB 模型不仅输出边界框坐标,还输出旋转角度 (θ) 或四个角点。这些坐标用于创建与对象方向对齐的边界框,从而提高旋转对象的检测准确性。

YOLO11 架构和 YOLO11 中的新增功能

YOLO11 架构是对 YOLOv8 架构的升级,具有一些新的集成和参数调整。在我们继续主要部分之前,您可以查看我们关于 YOLOv8 的详细文章以大致了解架构。现在,如果你看一下 YOLO11 的配置文件:

1
2
3
4
5
6
7
8
9
10
11
12
13
14
15
16
17
18
19
20
21
22
23
24
25
26
27
28
29
30
31
32
33
34
35
36
37
38
39
40
41
42
43
44
# Parameters
nc: 80 # number of classes
scales: # model compound scaling constants, i.e. 'model=yolo11n.yaml' will call yolo11.yaml with scale 'n'
# [depth, width, max_channels]
n: [0.50, 0.25, 1024] # summary: 319 layers, 2624080 parameters, 2624064 gradients, 6.6 GFLOPs
s: [0.50, 0.50, 1024] # summary: 319 layers, 9458752 parameters, 9458736 gradients, 21.7 GFLOPs
m: [0.50, 1.00, 512] # summary: 409 layers, 20114688 parameters, 20114672 gradients, 68.5 GFLOPs
l: [1.00, 1.00, 512] # summary: 631 layers, 25372160 parameters, 25372144 gradients, 87.6 GFLOPs
x: [1.00, 1.50, 512] # summary: 631 layers, 56966176 parameters, 56966160 gradients, 196.0 GFLOPs

# YOLO11n backbone
backbone:
# [from, repeats, module, args]
- [-1, 1, Conv, [64, 3, 2]] # 0-P1/2
- [-1, 1, Conv, [128, 3, 2]] # 1-P2/4
- [-1, 2, C3k2, [256, False, 0.25]]
- [-1, 1, Conv, [256, 3, 2]] # 3-P3/8
- [-1, 2, C3k2, [512, False, 0.25]]
- [-1, 1, Conv, [512, 3, 2]] # 5-P4/16
- [-1, 2, C3k2, [512, True]]
- [-1, 1, Conv, [1024, 3, 2]] # 7-P5/32
- [-1, 2, C3k2, [1024, True]]
- [-1, 1, SPPF, [1024, 5]] # 9
- [-1, 2, C2PSA, [1024]] # 10

# YOLO11n head
head:
- [-1, 1, nn.Upsample, [None, 2, "nearest"]]
- [[-1, 6], 1, Concat, [1]] # cat backbone P4
- [-1, 2, C3k2, [512, False]] # 13

- [-1, 1, nn.Upsample, [None, 2, "nearest"]]
- [[-1, 4], 1, Concat, [1]] # cat backbone P3
- [-1, 2, C3k2, [256, False]] # 16 (P3/8-small)

- [-1, 1, Conv, [256, 3, 2]]
- [[-1, 13], 1, Concat, [1]] # cat head P4
- [-1, 2, C3k2, [512, False]] # 19 (P4/16-medium)

- [-1, 1, Conv, [512, 3, 2]]
- [[-1, 10], 1, Concat, [1]] # cat head P5
- [-1, 2, C3k2, [1024, True]] # 22 (P5/32-large)

- [[16, 19, 22], 1, Detect, [nc]] # Detect(P3, P4, P5)

架构级别的变化:

1. 骨干

主干是模型的一部分,用于从多个比例的输入图像中提取特征。它通常涉及堆叠卷积层和块以创建不同分辨率的特征图。

卷积层:YOLO11 具有类似的结构,带有初始卷积层来对图像进行下采样:

1
2
- [-1, 1, Conv, [64, 3, 2]] # 0-P1/2
- [-1, 1, Conv, [128, 3, 2]] # 1-P2/4
  • C3k2 区块:YOLO11 引入了 C3k2 块,而不是 C2f,它在计算方面效率更高。此块是 CSP 瓶颈的自定义实现,它使用两个卷积,而不是一个大型卷积(如 YOLOv8 中所示)。

    • CSP (Cross Stage Partial):CSP 网络拆分特征图并通过瓶颈层处理一部分,同时将另一部分与瓶颈的输出合并。这减少了计算负载并改善了特征表示。
    1
    - [-1, 2, C3k2, [256, False, 0.25]]
    • C3k2 块还使用较小的内核大小(由 k2 表示),使其更快,同时保持性能。

    SPPF 和 C2PSA:YOLO11 保留了 SPPF 块,但在 SPPF 之后添加了一个新的 C2PSA 块:

1
2
- [-1, 1, SPPF, [1024, 5]]
- [-1, 2, C2PSA, [1024]
  • C2PSA (Cross Stage Partial with Spatial Attention) 模块增强了特征图中的空间注意力,从而提高了模型对图像重要部分的关注。这使模型能够通过在空间上池化特征来更有效地关注特定的感兴趣区域。

2. neck

neck 负责聚合来自不同分辨率的特征,并将它们传递给头部进行预测。它通常涉及来自不同级别的特征图的上采样和连接。

C3k2 区块:YOLO11 用 C3k2 块替换了颈部的 C2f 块。如前所述,C3k2 是一个更快、更高效的区块。例如,在上采样和串联后,YOLO11 中的 neck 如下所示:

1
2
	
- [-1, 2, C3k2, [512, False]] # P4/16-medium
  • 此更改提高了要素聚合过程的速度和性能。
  • 注意力机制:YOLO11 通过 C2PSA 更侧重于空间注意力,这有助于模型专注于图像中的关键区域,以便更好地检测。这在 YOLOv8 中是缺失的,这使得 YOLO11 在检测较小或被遮挡的对象时可能更准确。

3. head

head 是模型中负责生成最终预测的部分。在对象检测中,这通常意味着生成边界框并对这些框内的对象进行分类。

C3k2 区块:与颈部类似,YOLO11 取代了头部的 C2f 块。

1
2
3
	
- [-1, 2, C3k2, [512, False]] # P4/16-medium

检测层:最终的 Detect 层与 YOLOv8 中的层相同:

1
2
- [[16, 19, 22], 1, Detect, [nc]] # Detect(P3, P4, P5)

使用 C3k2 块使模型在推理方面更快,在参数方面更高效。
那么,让我们看看新块(层)在代码中的样子:


那么,让我们看看新块(层)在代码中的样子:

  1. C3k2 区块(从 blocks.py 开始):
    • C3k2CSP 瓶颈的更快、更高效的变体。它使用两个卷积而不是一个大型卷积,从而加快了特征提取速度。
1
2
3
4
5
6
class C3k2(C2f):
def __init__(self, c1, c2, n=1, c3k=False, e=0.5, g=1, shortcut=True):
super().__init__(c1, c2, n, shortcut, g, e)
self.m = nn.ModuleList(
C3k(self.c, self.c, 2, shortcut, g) if c3k else Bottleneck(self.c, self.c, shortcut, g) for _ in range(n)
)
  1. C3k 块(从 blocks.py 开始
  • C3k 是一个更灵活的瓶颈模块,允许自定义内核大小。这对于提取图像中更详细的特征非常有用。
1
2
3
4
5
class C3k(C3):
def __init__(self, c1, c2, n=1, shortcut=True, g=1, e=0.5, k=3):
super().__init__(c1, c2, n, shortcut, g, e)
c_ = int(c2 * e) # hidden channels
self.m = nn.Sequential(*(Bottleneck(c_, c_, shortcut, g, k=(k, k), e=1.0) for _ in range(n)))
  1. C2PSA 块(从 blocks.py 年起):
  • C2PSA (Cross Stage Partial with Spatial Attention) 增强了模型的空间注意力能力。此模块增加了对特征图的关注,帮助模型专注于图像的重要区域。
1
2
3
4
5
6
7
8
9
10
class C2PSA(nn.Module):
def __init__(self, c1, c2, e=0.5):
super().__init__()
c_ = int(c2 * e)
self.cv1 = Conv(c1, c_, 1, 1)
self.cv2 = Conv(c1, c_, 1, 1)
self.cv3 = Conv(2 * c_, c2, 1)

def forward(self, x):
return self.cv3(torch.cat((self.cv1(x), self.cv2(x)), 1))

YOLO11 pipeline

ultralytics GitHub 仓库中,我们将主要关注:

  1. nn/modules/ 中的模块
    • block.py
    • conv.py
    • head.py
    • transformer.py
    • utils.py
  2. nn/tasks.py 文件

1. 代码库概述

代码库被构建为多个模块,这些模块定义了 YOLO11 模型中使用的各种神经网络组件。这些组件在 nn/modules/ 目录中被组织到不同的文件中:

  • block.py:定义模型中使用的各种构建块(模块),例如瓶颈、CSP 模块和注意力机制。
  • conv.py:包含卷积模块,包括标准卷积、深度卷积和其他变体。
  • head.py:实现负责生成最终预测(例如,边界框、类概率)的模型头。
  • transformer.py:包括基于 transformer 的模块,用于注意力机制和高级特征提取。
  • utils.py:提供跨模块使用的实用程序函数和帮助程序类。

nn/tasks.py 文件定义了不同的特定于任务的模型(例如,检测、分割、分类),这些模型将这些模块组合成完整的架构。

2. nn/modules/ 中的模块

如前所述,YOLO11 构建在 YOLOv8 代码库之上。因此,我们将主要关注更新的脚本:block.pyconv.pyhead.py 在这里。

block.py

此文件定义 YOLO11 模型中使用的各种构建块。这些块是构成神经网络层的基本组件。

关键组件:
  1. 瓶颈模块:
    • Bottleneck:具有可选快捷方式连接的标准瓶颈模块。
    • Res:使用一系列卷积和身份快捷方式的残差块。
1
2
3
4
5
6
7
8
9
10
11
class Bottleneck(nn.Module):
def __init__(self, c1, c2, shortcut=True, g=1, e=0.5):
super().__init__()
c_ = int(c2 * e)
self.cv1 = Conv(c1, c_, 1, 1)
self.cv2 = Conv(c_, c2, 3, 1, g=g)
self.add = shortcut and c1 == c2

def forward(self, x):
return x + self.cv2(self.cv1(x)) if self.add else self.cv2(self.cv1(x))

  • Bottleneck 类实现了一个 bottleneck 模块,该模块减少了通道的数量(降维),然后再次扩展它们。
  • 组件
    • self.cv1:一个 1×1 卷积,用于减少通道数。
    • self.cv2:一个 3×3 卷积,用于将通道数增加回原始通道数。
    • self.add:一个布尔值,指示是否添加快捷方式连接。
  • Forward Pass:输入 x 通过 cv1 和 cv2 传递。如果 self.add 为 True,则原始输入 x 将添加到输出(残差连接)。
  1. CSP (Cross Stage Partial) 模块:
  • BottleneckCSP:瓶颈模块的 CSP 版本。
  • CSPBlock:具有多个瓶颈层的更复杂的 CSP 模块。
1
2
3
4
5
6
7
8
9
10
11
12
13
14
15
16
class BottleneckCSP(nn.Module):
def __init__(self, c1, c2, n=1, shortcut=True, g=1, e=0.5):
super().__init__()
c_ = int(c2 * e)
self.cv1 = Conv(c1, c_, 1, 1)
self.cv2 = nn.Sequential(
*[Bottleneck(c_, c_, shortcut, g, e=1.0) for _ in range(n)]
)
self.cv3 = Conv(2 * c_, c2, 1)
self.add = c1 == c2

def forward(self, x):
y1 = self.cv2(self.cv1(x))
y2 = x if self.add else None
return self.cv3(torch.cat((y1, y2), 1)) if y2 is not None else self.cv3(y1)

  • CSPBottleneck 模块将特征图分为两部分。一部分通过一系列瓶颈层,另一部分直接连接到输出,从而降低了计算成本并增强了梯度流。
  • 组件
    • self.cv1:减少通道数。
    • self.cv2:瓶颈层序列。
    • self.cv3:合并功能并调整通道数。
    • self.add:确定是否添加快捷方式连接。
  1. 其他模块:
  • SPPF:Spatial Pyramid Pooling Fast 模块,可在多个比例下执行池化。
  • Concat:沿指定维度连接多个 Tensor。
1
2
3
4
5
6
7
8
9
10
11
12
13
14
class SPPF(nn.Module):
def __init__(self, c1, c2, k=5):
super().__init__()
c_ = c1 // 2
self.cv1 = Conv(c1, c_, 1, 1)
self.cv2 = Conv(c_ * 4, c2, 1, 1)
self.m = nn.MaxPool2d(kernel_size=k, stride=1, padding=k // 2)

def forward(self, x):
x = self.cv1(x)
y1 = self.m(x)
y2 = self.m(y1)
y3 = self.m(y2)
return self.cv2(torch.cat([x, y1, y2, y3], 1))
  • SPPF 模块在不同比例下执行最大池化,并将结果连接起来以捕获多个空间比例的要素。
  • 组件
    • self.cv1:减少通道数。
    • self.cv2:调整拼接后的 Channel 数。
    • self.m:最大池化层数。
  • Forward Pass:输入 x 通过 cv1,然后通过三个连续的最大池化层(y1、y2、y3)。结果被连接并通过 cv2 传递。
了解概念:
  • 瓶颈层:用于通过在昂贵的操作之前减少通道数并在之后增加通道数来降低计算复杂性。
  • 残差连接:通过缓解梯度消失问题来帮助训练更深的网络。
  • CSP 架构:将特征图分为两部分;一部分发生转换,而另一部分保持不变,从而提高学习能力并减少计算。

conv.py

此文件包含各种卷积模块,包括标准卷积和专用卷积。

关键组件:

标准卷积模块 (Conv):

1
2
3
4
5
6
7
8
9
10
11
class Conv(nn.Module):
default_act = nn.SiLU() # default activation

def __init__(self, c1, c2, k=1, s=1, p=None, g=1, d=1, act=True):
super().__init__()
self.conv = nn.Conv2d(c1, c2, k, s, autopad(k, p, d), groups=g, dilation=d, bias=False)
self.bn = nn.BatchNorm2d(c2)
self.act = self.default_act if act is True else act if isinstance(act, nn.Module) else nn.Identity()

def forward(self, x):
return self.act(self.bn(self.conv(x)))
  • 实现具有批量规范化和激活的标准卷积层。
  • 组件
    • self.conv:卷积层。
    • self.bn:批量规范化。
    • self.act:激活函数(默认为 nn.SiLU())的
  • Forward Pass:应用卷积,然后进行批量规范化和激活。

深度卷积 (DWConv):

1
2
3
class DWConv(Conv):
def __init__(self, c1, c2, k=1, s=1, d=1, act=True):
super().__init__(c1, c2, k, s, g=math.gcd(c1, c2), d=d, act=act)
  • 执行深度卷积,其中每个输入通道单独卷积。
  • 组件
    • 继承自 Conv。
    • 将 groups 参数设置为 c1 和 c2 的最大公约数,从而有效地对每个通道的卷积进行分组。
  1. 其他卷积模块:
    • Conv2:RepConv 的简化版本,用于模型压缩和加速。
    • GhostConv:实现 GhostNet 的 ghost 模块,减少特性图中的冗余。
    • RepConv:可重新参数化的卷积层,可以从训练模式转换为推理模式。
了解概念:
  • 自动填充 (autopad):自动计算保持输出尺寸一致所需的填充。
  • 深度卷积和点卷积:用于 MobileNet 架构,以减少计算,同时保持准确性。
  • 重新参数化:RepConv 等技术通过合并层来实现高效的训练和更快的推理。

head.py

此文件实现了负责生成模型最终预测的 head 模块。

关键组件:

检测头 (Detect):

1
2
3
4
5
6
7
8
9
10
11
12
13
14
15
16
17
18
19
20
21
22
class Detect(nn.Module):
def __init__(self, nc=80, ch=()):
super().__init__()
self.nc = nc # number of classes
self.nl = len(ch) # number of detection layers
self.reg_max = 16 # DFL channels
self.no = nc + self.reg_max * 4 # number of outputs per anchor
self.stride = torch.zeros(self.nl) # strides computed during build

# Define layers
self.cv2 = nn.ModuleList(
nn.Sequential(Conv(x, c2, 3), Conv(c2, c2, 3), nn.Conv2d(c2, 4 * self.reg_max, 1)) for x in ch
)
self.cv3 = nn.ModuleList(
nn.Sequential(
nn.Sequential(DWConv(x, x, 3), Conv(x, c3, 1)),
nn.Sequential(DWConv(c3, c3, 3), Conv(c3, c3, 1)),
nn.Conv2d(c3, self.nc, 1),
)
for x in ch
)
self.dfl = DFL(self.reg_max) if self.reg_max > 1 else nn.Identity()
  • Detect 类定义输出边界框坐标和类概率的检测头。
  • 组件
    • self.cv2:用于边界框回归的卷积层。
    • self.cv3:用于分类的卷积层。
    • self.dfl:用于边界框细化的 Distribution Focal Loss 模块。
  • Forward Pass:处理输入特征映射并输出边界框和类的预测。

分割 (Segment):

1
2
3
4
5
6
7
8
9
10
class Segment(Detect):
def __init__(self, nc=80, nm=32, npr=256, ch=()):
super().__init__(nc, ch)
self.nm = nm # number of masks
self.npr = npr # number of prototypes
self.proto = Proto(ch[0], self.npr, self.nm) # protos

c4 = max(ch[0] // 4, self.nm)
self.cv4 = nn.ModuleList(nn.Sequential(Conv(x, c4, 3), Conv(c4, c4, 3), nn.Conv2d(c4, self.nm, 1)) for x in ch)

  • 扩展 Detect 类以包含分段功能。
  • 组件
    • self.proto:生成掩码原型。
    • self.cv4:掩码系数的卷积层。
  • Forward Pass:输出边界框、类概率和掩码系数。

姿势估计头部 (Pose):

1
2
3
4
5
6
7
8
9
class Pose(Detect):
def __init__(self, nc=80, kpt_shape=(17, 3), ch=()):
super().__init__(nc, ch)
self.kpt_shape = kpt_shape # number of keypoints, number of dimensions
self.nk = kpt_shape[0] * kpt_shape[1] # total number of keypoint outputs

c4 = max(ch[0] // 4, self.nk)
self.cv4 = nn.ModuleList(nn.Sequential(Conv(x, c4, 3), Conv(c4, c4, 3), nn.Conv2d(c4, self.nk, 1)) for x in ch)

  • 扩展了 Detect 类,用于人体姿势估计任务。
  • 组件
    • self.kpt_shape:关键点的形状(关键点的数量、每个关键点的维度)。
    • self.cv4:用于关键点回归的卷积层。
  • Forward Pass:输出边界框、类概率和关键点坐标。
了解概念:
  • 模块化:通过扩展 Detect 类,我们可以为不同的任务创建专门的 head,同时重用通用功能。
  • 无锚点检测:现代对象检测器通常使用无锚点方法,直接预测边界框。
  • 关键点估计:在姿势估计中,模型预测表示关节或地标的关键点。

3. nn/tasks.py 文件

1
2
3
4
5
6
7
8
9
10
11
12
13
14
15
16
17
18
19
20
21
22
23
24
25
26
27
28
29
30
31
32
33
34
35
36
37
38
39
40
41
42
43
44
45
46
47
48
49
50
51
52
53
54
55
56
57
58
59
60
61
62
63
64
65
66
67
68
69
70
71
72
73
74
75
76
77
78
79
80
81
82
83
84
85
86
87
88
89
90
91
92
93
94
95
96
97
98
99
100
101
102
103
104
105
106
107
108
109
110
111
112
113
114
115
116
117
118
119
120
121
122
123
124
125
126
127
128
129
130
131
132
133
134
135
136
137
138
139
140
141
142
143
144
145
146
147
148
149
150
151
152
153
154
155
156
157
158
159
160
161
162
163
164
165
166
167
168
169
170
171
172
173
174
175
176
177
178
179
180
181
182
183
184
185
186
187
188
189
190
191
192
193
194
195
196
197
198
199
200
201
202
203
204
205
206
207
208
209
210
# Ultralytics YOLO <img draggable="false" role="img" class="emoji" alt="🚀" src="https://s.w.org/images/core/emoji/15.0.3/svg/1f680.svg">, AGPL-3.0 license

import contextlib
import pickle
import types
from copy import deepcopy
from pathlib import Path

import torch
import torch.nn as nn

# Other imports...

class BaseModel(nn.Module):
"""The BaseModel class serves as a base class for all the models in the Ultralytics YOLO family."""

def forward(self, x, *args, **kwargs):
"""Handles both training and inference, returns predictions or loss."""
if isinstance(x, dict):
return self.loss(x, *args, **kwargs) # Training: return loss
return self.predict(x, *args, **kwargs) # Inference: return predictions

def predict(self, x, profile=False, visualize=False, augment=False, embed=None):
"""Run a forward pass through the network for inference."""
if augment:
return self._predict_augment(x)
return self._predict_once(x, profile, visualize, embed)

def fuse(self, verbose=True):
"""Fuses Conv and BatchNorm layers for efficiency during inference."""
for m in self.model.modules():
if isinstance(m, (Conv, Conv2, DWConv)) and hasattr(m, "bn"):
m.conv = fuse_conv_and_bn(m.conv, m.bn)
delattr(m, "bn")
m.forward = m.forward_fuse # Use the fused forward
return self

# More BaseModel methods...

class DetectionModel(BaseModel):
"""YOLOv8 detection model."""

def __init__(self, cfg="yolov8n.yaml", ch=3, nc=None, verbose=True):
"""Initialize the YOLOv8 detection model with config and parameters."""
super().__init__()
self.yaml = cfg if isinstance(cfg, dict) else yaml_model_load(cfg)
self.model, self.save = parse_model(deepcopy(self.yaml), ch=ch, verbose=verbose)
self.names = {i: f"{i}" for i in range(self.yaml["nc"])} # Class names
self.inplace = self.yaml.get("inplace", True)

# Initialize strides
m = self.model[-1] # Detect() layer
if isinstance(m, Detect):
s = 256 # Max stride
m.stride = torch.tensor([s / x.shape[-2] for x in self._predict_once(torch.zeros(1, ch, s, s))])
self.stride = m.stride
m.bias_init() # Initialize biases

# More DetectionModel methods...

class SegmentationModel(DetectionModel):
"""YOLOv8 segmentation model."""

def __init__(self, cfg="yolov8n-seg.yaml", ch=3, nc=None, verbose=True):
"""Initialize YOLOv8 segmentation model with given config and parameters."""
super().__init__(cfg=cfg, ch=ch, nc=nc, verbose=verbose)

def init_criterion(self):
"""Initialize the loss criterion for the SegmentationModel."""
return v8SegmentationLoss(self)

class PoseModel(DetectionModel):
"""YOLOv8 pose model."""

def __init__(self, cfg="yolov8n-pose.yaml", ch=3, nc=None, data_kpt_shape=(None, None), verbose=True):
"""Initialize YOLOv8 Pose model."""
if not isinstance(cfg, dict):
cfg = yaml_model_load(cfg)
if list(data_kpt_shape) != list(cfg["kpt_shape"]):
cfg["kpt_shape"] = data_kpt_shape
super().__init__(cfg=cfg, ch=ch, nc=nc, verbose=verbose)

def init_criterion(self):
"""Initialize the loss criterion for the PoseModel."""
return v8PoseLoss(self)

class ClassificationModel(BaseModel):
"""YOLOv8 classification model."""

def __init__(self, cfg="yolov8n-cls.yaml", ch=3, nc=None, verbose=True):
"""Initialize the YOLOv8 classification model."""
super().__init__()
self._from_yaml(cfg, ch, nc, verbose)

def _from_yaml(self, cfg, ch, nc, verbose):
"""Set YOLOv8 model configurations and define the model architecture."""
self.yaml = cfg if isinstance(cfg, dict) else yaml_model_load(cfg)
self.model, self.save = parse_model(deepcopy(self.yaml), ch=ch, verbose=verbose)
self.names = {i: f"{i}" for i in range(self.yaml["nc"])}
self.info()

def reshape_outputs(model, nc):
"""Update a classification model to match the class count (nc)."""
name, m = list((model.model if hasattr(model, "model") else model).named_children())[-1]
if isinstance(m, nn.Linear):
if m.out_features != nc:
setattr(model, name, nn.Linear(m.in_features, nc))

def init_criterion(self):
"""Initialize the loss criterion for the ClassificationModel."""
return v8ClassificationLoss()

class Ensemble(nn.ModuleList):
"""Ensemble of models."""

def __init__(self):
"""Initialize an ensemble of models."""
super().__init__()

def forward(self, x, augment=False, profile=False, visualize=False):
"""Generate the ensemble’s final layer by combining outputs from each model."""
y = [module(x, augment, profile, visualize)[0] for module in self]
return torch.cat(y, 2), None # Concatenate outputs along the third dimension

# Functions ------------------------------------------------------------------------------------------------------------

def parse_model(d, ch, verbose=True):
"""Parse a YOLO model.yaml dictionary into a PyTorch model."""
import ast

max_channels = float("inf")
nc, act, scales = (d.get(x) for x in ("nc", "activation", "scales"))
depth, width, kpt_shape = (d.get(x, 1.0) for x in ("depth_multiple", "width_multiple", "kpt_shape"))

# Model scaling
if scales:
scale = d.get("scale")
if not scale:networ
scale = tuple(scales.keys())[0]
LOGGER.warning(f"WARNING <img draggable="false" role="img" class="emoji" alt="⚠️" src="https://s.w.org/images/core/emoji/15.0.3/svg/26a0.svg"> no model scale passed. Assuming scale='{scale}'.")
depth, width, max_channels = scales[scale]

if act:
Conv.default_act = eval(act) # redefine default activation
if verbose:
LOGGER.info(f"Activation: {act}")

# Logging and parsing layers
if verbose:
LOGGER.info(f"\n{'':>3}{'from':>20}{'n':>3}{'params':>10} {'module':<45}{'arguments':<30}")
ch = [ch]
layers, save, c2 = [], [], ch[-1]

for i, (f, n, m, args) in enumerate(d["backbone"] + d["head"]): # from, number, module, args
m = globals()[m] if m in globals() else getattr(nn, m[3:], m) # get module
for j, a in enumerate(args):
if isinstance(a, str):
with contextlib.suppress(ValueError):
args[j] = ast.literal_eval(a) if a in locals() else a

n = max(round(n * depth), 1) if n > 1 else n # depth gain
if m in {Conv, Bottleneck, C2f, C3k2, ...}: # Module list
c1, c2 = ch[f], args[0]
c2 = make_divisible(min(c2, max_channels) * width, 8)
args = [c1, c2, *args[1:]]
if m in {C2f, C3k2, ...}: # Repeated layers
args.insert(2, n)
n = 1
elif m in {Concat, Detect, ...}: # Head layers
args.append([ch[x] for x in f])
# Append layers
m_ = nn.Sequential(*(m(*args) for _ in range(n))) if n > 1 else m(*args)
layers.append(m_)

ch.append(c2)
save.extend([x % i for x in ([f] if isinstance(f, int) else f) if x != -1])

if verbose:
LOGGER.info(f"{i:>3}{str(f):>20}{n:>3}{sum(x.numel() for x in m_.parameters()):10.0f} {str(m):<45}{str(args):<30}")

return nn.Sequential(*layers), sorted(save)

def yaml_model_load(path):
"""Load a YOLO model from a YAML file."""
path = Path(path)
unified_path = path.with_name(path.stem.replace("yolov8", "yolov"))
yaml_file = check_yaml(str(unified_path), hard=False) or check_yaml(path)
d = yaml_load(yaml_file)
d["scale"] = guess_model_scale(path)
d["yaml_file"] = str(path)
return d

# More utility functions...

def guess_model_scale(model_path):
"""Extract the scale from the YAML file."""
import re
return re.search(r"yolov\d+([nslmx])", Path(model_path).stem).group(1)

def attempt_load_weights(weights, device=None, inplace=True, fuse=False):
"""Loads weights for a model or an ensemble of models."""
ensemble = Ensemble()
for w in weights if isinstance(weights, list) else [weights]:
ckpt, _ = torch_safe_load(w)
model = (ckpt.get("ema") or ckpt["model"]).to(device).float()
model = model.fuse().eval() if fuse and hasattr(model, "fuse") else model.eval()
ensemble.append(model)

return ensemble if len(ensemble) > 1 else ensemble[-1]

此 tasks.py 脚本是代码管道的核心部分;它仍然使用 YOLOv8 方法和逻辑;我们只需要将 YOLO11 模型解析到其中。此脚本专为各种计算机视觉任务而设计,例如对象检测、分割、分类、姿势估计、OBB 等。它定义了用于训练、推理和模型管理的基础模型、特定于任务的模型和效用函数。

关键组件:

  • Imports:该脚本从 Ultralytics 导入 PyTorch (torch)、神经网络层 (torch.nn) 和实用函数等基本模块。一些关键导入包括:
    • C3k2C2PSAC3SPPF、****Concat 等架构模块进行建模。
    • 损失函数,如 v8DetectionLossv8SegmentationLossv8ClassificationLossv8OBBLoss
    • 各种实用程序函数,如 model_info、fuse_conv_and_bnscale_img time_sync,以帮助进行模型处理、分析和评估。

模型基类:

  1. BaseModel 类:
    • BaseModel 用作 Ultralytics YOLO 系列中所有模型的基类。
    • 实现如下基本方法:
      • forward():根据输入数据处理训练和推理。
      • predict():处理前向传递以进行推理。
      • fuse():融合 Conv2d 和 BatchNorm2d 层以提高效率。
      • info():提供详细的模型信息。
    • 此类旨在通过特定于任务的模型(例如检测、分割和分类)进行扩展。
  2. DetectionModel 类:
    • 扩展 BaseModel,专门用于对象检测任务。
    • 加载模型配置,初始化检测头(如 Detect 模块)并设置模型步幅。
    • 它支持使用 YOLOv8 等架构的检测任务,并可以通过 _predict_augment() 执行增强推理。

特定于任务的模型:

  1. SegmentationModel 的 SegmentationModel 中:
    • 专门用于分割任务(如 YOLOv8 分割)的 DetectionModel 的子类。
    • 初始化特定于分割的损失函数 (v8SegmentationLoss)。
  2. PoseModel 的 PoseModel 中:
    • 通过初始化具有关键点检测 (kpt_shape) 特定配置的模型来处理姿态估计任务。
    • 使用 v8PoseLoss 进行特定于姿势的损失计算。
  3. 分类型号****:
    • 专为使用 YOLOv8 分类架构的图像分类任务而设计。
    • 初始化和管理特定于分类的损失 (v8ClassificationLoss)。
    • 它还支持重塑用于分类任务的预训练 TorchVision 模型。
  4. OBB型号****:
    • 用于定向边界框 (OBB) 检测任务。
    • 实现特定的损失函数 (v8OBBLoss) 来处理旋转的边界框。
  5. 世界模型****:
    • 此模型处理图像字幕和基于文本的识别等任务。
    • 利用 CLIP 模型中的文本特征执行基于文本的视觉识别任务。
    • 包括对文本嵌入 (txt_feats) 的特殊处理,用于字幕和世界相关任务。

集成模型:

  1. 集成****:
    • 一个简单的 ensemble 类,它将多个模型合并为一个模型。
    • 允许对不同模型的输出进行平均或串联,以提高整体性能。
    • 对于组合多个模型的输出提供更好的预测的任务非常有用。

实用功能:

  1. 模型加载和管理:
    • attempt_load_weights()、****attempt_load_one_weight():用于加载模型、管理集成模型以及处理加载预训练权重时的兼容性问题的函数。
    • 这些功能可确保以适当的步幅、层和配置正确加载模型。
  2. 临时模块重定向:
    • temporary_modules():一个上下文管理器,用于临时重定向模块路径,确保在模块位置更改时向后兼容。
    • 有助于保持与旧型号版本的兼容性。
  3. Pickle安全处理:
    • SafeUnpickler:一个自定义的解封器,可以安全地加载模型检查点,确保未知类被安全的占位符(SafeClass)替换,以避免在加载过程中发生崩溃。

模型解析:

  1. parse_model() 中:
    • 此函数将 YAML 文件中的模型配置解析为 PyTorch 模型。
    • 它处理主干和头架构,解释每个层类型(如 Conv、SPPF、Detect),并构建最终模型。
    • 支持各种架构,包括 C3k2、C2PSA 等 YOLO11 组件。
  2. YAML 模型加载:
    • yaml_model_load()):从 YAML 文件加载模型配置,检测模型比例(例如 n、s、m、l、x)并相应地调整参数。
    • guess_model_scale()、****guess_model_task():用于根据 YAML 文件结构推断模型规模和任务的辅助函数。

YOLO11 详解
https://chongzicbo.github.io/2024/12/07/人工智能/computer-vision/CV007-YOLO11详解/
Author
程博
Posted on
December 7, 2024
Licensed under